How to Install a stationary go-e Wallbox: Guide for Users and Electricians
Last updated:
Installing a stationary wallbox like the go-e Charger Gemini yourself is strongly not recommended. This is because it needs to be connected to the mains, which requires specific expertise.
In contrast, installing a mobile charger such as the go-e Charger Gemini flex is very simple, as you need to plug it into a socket just like a phone or tablet charger, only the socket looks very different.
So, how can you get a stationary charger installed safely and quickly? Just give a certified electrician a call. You can find one in your area, or you can use go-e's trusted partners who are experts in installing go-e Chargers. They'll do it faster since they're already professionals and won't need to go through the installation instructions.
In this blog post, you will find a detailed step-by-step guide on how to install a stationary wallbox. But first, let’s talk about some key legal aspects that you need to consider.
You’ve got a handle on all legal ins and outs for setting up an EV wallbox in your country? Fantastic! Then select "Preparing For Installation of a Stationary Wallbox" or "Installing A Stationary Wallbox in Ten Steps" in the right sidebar and jump right into the guide. 👉
Wallbox Installation Requirements in Your Country
Installing a wallbox for electric vehicle charging can be a somewhat intricate process, depending on your location in Europe. There are often specific rules and regulations in place to ensure safety and grid stability. In fact, in some instances, you may need to jump through a few bureaucratic hoops.
Take Austria, for example. Here, if you want to install a stationary wallbox, regardless of its power rating, it's necessary to have it registered with the electricity network operator. This responsibility usually falls to the electrician who carries out the installation. On the flip side, if you opt for a mobile charging station, which is sometimes referred to as a “smart charging cable,” you can forget about the registration process altogether.
go-e Charger Gemini 11 kW
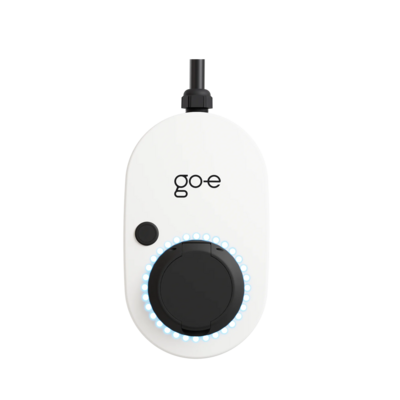
The compact wallbox for stationary use, at home or at the workplace. Simple installation, intuitive operation and smart comfort functions. Charging power from 1.4 kW to 11 kW. 1-phase or 3-phase charging.
go-e Charger Gemini 22 kW
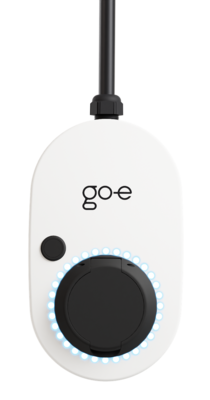
The compact wallbox for stationary use, at home or at the workplace. Simple installation, intuitive operation and smart comfort functions. Charging power from 1.4 kW to 22 kW. 1-phase or 3-phase charging.
go-e Charger Gemini flex 11 kW
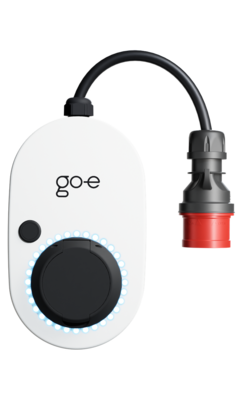
The intelligent wallbox can be used both stationary in the wall bracket and mobile. No electrician is required for the installation of the charging station. Charging power from 1.4 kW to 11 kW. 1-phase or 3-phase charging.
go-e Charger Gemini flex 22 kW

The intelligent wallbox can be used both stationary in the wall bracket and mobile. No electrician is required for the installation of the charging station. Charging power from 1.4 kW to 22 kW. 1-phase or 3-phase charging.
Germany has its own set of rules. If you're looking to set up a wallbox with an output of 11 kW, you only need to notify the network operator, letting them know about your plans. However, when you decide to use a more powerful 22 kW wallbox, whether mobile or stationary, the rules change. Not only do you need to report it, but you must also obtain official approval before the wallbox can become operational.
Switzerland takes a somewhat different approach. To set up any charging station, even if it's connected via a standard socket, you need to go through a registration process. This means either directly registering the installation with your distribution network operator or ensuring that your electrician has taken care of this essential step.
In countries like Sweden and Finland, the process of installing a wallbox is notably easier. The thing is that there is no registration or permit required, even for stationary units.
Installation in Single-Family House/Multi-Family House vs. Businesses
The complexity of the installation also depends on the type of building where you want to mount the charger. Here are three of the most common situations:
Single-Family Homes
Installing an EV wallbox in a single-family home is often the simplest scenario. As a homeowner, you can choose a location that suits your preferences, such as in the garage or near your parking space. Wiring and power distribution are generally straightforward since the whole electrical system is dedicated to your residence. If the electrical system of the building is already outdated, the effort and costs can, of course, also increase. Receiving any approvals, though, is more streamlined and requires minimal external input.
Multi-Family Homes
In multi-family housing, such as apartment buildings, installing EV wallboxes can be more tricky. The biggest challenges are:
- shared infrastructure
- any consent required from other owners of the building or the landlord
- need to accommodate multiple users.
The total effort and expense depends, among other things, on whether the charging station is set up for an individual only at a specific parking space or whether it is a communal installation with one or more wallboxes. Decisions regarding the number of charging stations, their locations, and cost-sharing arrangements is likely to be subject to group discussions and agreements. On top of that, common electrical infrastructure may need upgrades to handle the increased demand, which can make installation more costly and time-consuming.
![[Translate to Englisch:] Material für die Wallbox Installation](/fileadmin/_processed_/e/a/csm_material-wallbox-installation_c6a4da9052.jpg)
Businesses
For businesses, installing EV wallboxes can be a strategic move. Companies sometimes not only want to charge their own vehicles but often want to provide EV charging to attract environmentally conscious customers and employees. In addition, the ability to charge your car at work makes daily commuting more convenient and attractive.
The installation process, though, typically involves many complex considerations. Businesses may need to assess factors like
- electrical capacity
- grid fees
- parking capacity
- customer accessibility
- and employee needs.
Preparing For Installation of a Stationary Wallbox - Guide for the User
Getting ready for the installation of your wallbox is not just about having the right tools. It's about setting the stage for a smooth and efficient process. That’s why we've put together a handy checklist that will not only speed up the installation but also ensure safety and convenience.
In certain situations, you might purchase the go-e Charger through an electrician who's been tasked to both sell and install them. This implies that you won't physically possess the Charger until it's expertly set up. Consequently, you won't have to make extensive preparations; only the first two points on the list apply to you in this scenario.
Do you want to allow Integration of youtube videos?
Allows the playback of videos, that are hosted on youtube.com. By allowing this feature, you accept the privacy agreement of google.
Do you have a go-e Charger sitting nicely in a box next to you? Here are some further preparations you can make:
3. Prepare the mounting material. In the box with the go-e Charger you will find:
- 5x dowels 8 x 40 mm
- 4x screws for wall bracket 4.5 x 50 mm
- 1x screw for U-piece 4 x 50 mm
- 1x U-piece (optional anti-theft device)
4. Make sure you have the Instructions and Installations guide at hand. Even though the process is fairly simple, there are some extra things you need to know before doing it. You normally receive the instructions with your wallbox. If you want to have a more detailed guide for installing the go-e Charger Gemini in the digital format (e.g. to send it to your electrician beforehand), you can download it here. Check the condition of the wall where the wallbox will be mounted. If there are any issues, like cracks or loose plaster, fix them beforehand. Alternatively, rely on your electrician to handle any necessary remedial work.
Clear the installation area of any obstructions or clutter. It'll make the electrician's job a lot easier and ensure a smooth setup.
Installing A Stationary Wallbox in Ten Steps - Guide for the Electrician
In this guide, the electrician will find everything that needs to be done when installing the go-e Charger Gemini.
Step 1: Position the wall mounting plate
Choose a comfortable height on the wall for the charger and ensure it's level. Place the go-e Charger between 1.00 and 1.45 m above the ground, depending on your customer’s personal comfort level. Use the wall bracket included in the wallbox package as a guide to mark the positions for four drill holes.

Step 2: Carefully drill holes at the marked spots.
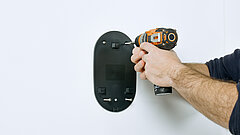
Step 3: Securely attach the wall bracket to the wall using the four screws and dowels which come with the wallbox.
If your wall isn't perfectly flat, consider using spacers to ensure an even mounting surface.
Step 4: Hook the wallbox onto the wall bracket. Your customer might also want to add a U-piece and a padlock, which make it impossible to remove the device from the wall bracket. Extra security doesn’t hurt, right?

We show how to do the aforementioned steps in our YouTube video:
Do you want to allow Integration of youtube videos?
Allows the playback of videos, that are hosted on youtube.com. By allowing this feature, you accept the privacy agreement of google.
Step 5: Turn off the power in the building. Safety first!
Step 6: The go-e Charger comes with an integrated DC protection module that includes DC detection and added AC detection capabilities, with specific thresholds set at 6 mA for DC and 20 mA for AC.
Note:
The go-e Charger adapts for both single-phase and three-phase connections.
For the electrical installation in the building, please adhere to the following guidelines:
- Install one type A RCD (Residual Current Device) per charging station on the supply side.
- Install one miniature circuit breaker upstream of the charger. Ensure that it is compatible with the charger's power requirements.
- Comply with all local installation regulations and safety codes applicable to your area.
You can use miniature circuit breakers with characteristics B or C, rated at either 16 or 32 amperes, depending on your specific requirements:
- 3- or 4-pole circuit breaker for three-phase connection
- 2-pole circuit breaker for single-phase connection
Note:
There is no need to open the go-e Charger during the installation process.
Step 7: Wallboxes such as our go-e Charger Gemini can be connected to both single-phase and three-phase power sources. If necessary, you may need to lay an additional supply line.
We'd like to offer some cable size recommendations, but it's essential for you as an electrician to make the final call based on the specific local conditions and requirements:

It is important that you lend a hand to your customer in selecting the correct cable size and decide whether a junction box is necessary.
Step 8: If your customer’s energy provider prescribes a ripple control receiver, you'll also need to install the two data cables (white and red). Polarity order, quite frankly, doesn't make a significant difference.
Step 9: Setting up several wallboxes? Connect the phases of the first, second, and potentially third charger to the home circuit in a rotation, just like the illustration below suggests. This way, your customer can comfortably charge multiple cars at once without any worries about balancing the load on the different phases.
Note:
If you use several chargers simultaneously, set them all to single-phase charging to balance the load. You can do it in the go-e Charger app. If they are charging e.g. three-phased, additional load balancing is needed to avoid blowing the fuse.
To balance loads effectively, your customer needs to activate static load balancing through the go-e Charger app. Internet connection is required for that. Combining the charger with the go-e Controller provides you with the opportunity to enable dynamic load balancing, which cleverly considers the home's overall electricity consumption.
Step 10: Start of the wallbox. After the installation is completed, you can go ahead and restore the power. You will see the charger's LEDs light up in rainbow colours as it confirms a successful installation and performs a self-test.
Step 11: After the power is back on, you or your customer can configure the charger to suit their needs. To make the setup even easier for you, we have created a video tutorial that will guide you through configuring our wallboxes.
Do you want to allow Integration of youtube videos?
Allows the playback of videos, that are hosted on youtube.com. By allowing this feature, you accept the privacy agreement of google.
The go-e Charger is now ready for operation.
Note:
The following part of the guide is intended for the go-e Charger user.
There are five predefined charging levels accessible via the button.
The number of blue LEDs = The number of amperes you selected for charging.
You can also customise the charging levels individually in the go-e Charger app, available in the Google Play Store and the App Store. Use a type 2 charging cable to connect the go-e wallbox to your electric vehicle. Your car has a type 1 socket? Then use a type 2 to type 1 adapter cable.
At this point, the charger is in standby mode, awaiting the initiation of the charging process. The LEDs on the charger will light up in warm yellow, indicating the selected charging current.
Once your vehicle authorises the charging process, the LEDs will commence a clockwise rotation around the type 2 socket. The number of "tails" formed by the LEDs corresponds to the number of connected phases or those set in the app:
- 1 rotating tail = 1-phase charging (230 V)
- 3 rotating tails = 3-phase charging (400 V)
Pay attention to the speed and length of the rotating tails for insights into the charging current.
The charging process is considered complete when the LEDs turn vibrant green.
Should you have a change of heart and want to halt the charging ahead of schedule, you can do so by using your vehicle's “cable release” function or by hitting the prominent round button within the go-e Charger app under “Charging.”
By default, the cable remains locked in the type 2 socket after charging finishes, providing theft protection. However, you can change this setting via the app.
In case of a power failure, for instance, due to a severe storm or an issue with the electrical grid, the cable will remain locked. To unlock it, you must power up the charging station again. If power doesn’t come back when you need to drive off, this could be a problem. Therefore, we made it possible for you to configure the app to automatically unlock the cable after a power failure. Be aware, though, that it won't be theft-protected in this scenario.
