Installation of the go-e Charger Gemini flex
Last updated:
You have recently bought the go-e Charger Gemini flex and want to install it at home, but don't know exactly how?
No problem at all.
In this blog post we explain step by step how to install your go-e Charger Gemini flex.
Do you want to allow Integration of youtube videos?
Allows the playback of videos, that are hosted on youtube.com. By allowing this feature, you accept the privacy agreement of google.
Prepare Your Tools for the Installation
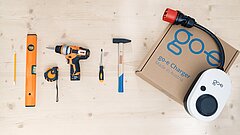
To install the go-e Charger Gemini flex, you need:
-
a pencil
-
a spirit level
-
a tape measure
-
a drill
-
a screwdriver
-
and a hammer
Prepare the enclosed fixing materials so that you have everything at hand when you need it.
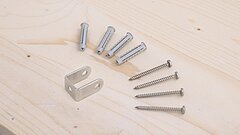
In the box in which the go-e Charger is packed, you should find the following mounting materials:
-
5 dowels (8 x 40mm)
-
4 screws for wall bracket (4.5 x 50 mm)
-
one screw for U-piece (4 x 50mm)
-
one U-piece
-
and one wall mounting plate
Before you start the assembly, please read the safety regulations in the reference guide enclosed with the charger.
Have you prepared everything?
Good, then let's move on to the assembly.
Install the go-e Charger Gemini flex
1. Position the wall mounting plate
Mount the go-e Charger approx. 1.00 to 1.45 metres above the floor, depending on your personal comfort level.
When determining the optimum installation position, ensure that there is a suitable distance to the three-phase socket so that the CEE plug of the charging station can be plugged in easily.
The go-e Charger must be mounted just below the CEE socket so that little pressure is exerted on the supply cable.
Hold the wall mounting plate at the desired mounting position and align it straight. It is best to use a spirit level so that the wallbox does not end up hanging crooked. :)
Then mark the four drill holes with a pencil.
2. Drill the holes
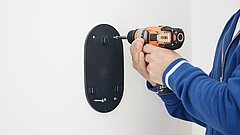
Now that you have marked the holes, you can take the drill and drill the holes in the marked places.
3. Fix the wall mounting plate
Fasten the wall mounting plate with four screws and four dowels. It is best to drive the dowels into the wall with a hammer.
If there are any unevennesses on the wall, you can usually level them out quite easily with spacers.
4. Hang the wallbox
Once you have attached the wall mounting plate, you can hang the wallbox into the wall bracket.
It's that simple. And basically the assembly is already done.
If you wish, you can attach the supplied U-piece directly above the go-e Charger, so that the unit cannot be removed from the wall mounting plate.
In addition, you can also attach a padlock, although the lock is not included in the delivery.
Finally, there are a few things you need to be aware of:
The type A RCD commonly used in buildings protects against sinusoidal and pulsating fault currents. However, due to the design of some on-board chargers in electric cars (e.g. Renault ZOE), DC faults can also occur.
Therefore, additional DC fault protection in the form of a type B RCD or DC protection module is required on the building side or in the charging station.
The go-e Charger has an integrated DC protection module. It switches off the charging station in the event of a fault current generated by the car and thus ensures the highest possible safety. On the building side, an RCD type A must be installed and a miniature circuit breaker must be installed upstream. The local installation regulations must be observed.
Miniature circuit breakers with characteristic B or C for 16 or 32 amperes are permissible:
- 3- or 4-pole for three-phase connection
- 2-pole for single-phase connection
Let's now take a look at the initial start-up so that you can start the charging process.
Put the go-e Charger Gemini flex into Operation
1. Connecting the charger
As a first step, connect the go-e Charger Gemini flex directly to the red CEE socket or to any suitable socket using an original go-e adapter.
2. Start the go-e Charger Gemini flex
As soon as the go-e Charger is connected, the LEDs will light up in rainbow colours. The reason for this is that the mobile wallbox carries out a self-test as part of the initial start-up or after a restart :)
3. Ready for charging
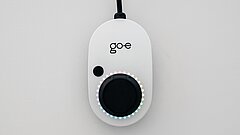
We can see now... the go-e Charger is ready for operation. The number of blue LEDs corresponds to the set charging current. You can select from 5 predefined charging levels using the push button, which allows you to adjust the current and thus the charging power and speed. This makes sense, for instance, if you want to charge more sustainably.
You can also adapt the charging levels of the button individually in the go-e Charger app, available in the Google Play Store and the App Store. Via the app, you are even able to adjust the current level continuously.
